Saturday, October 17, 2009

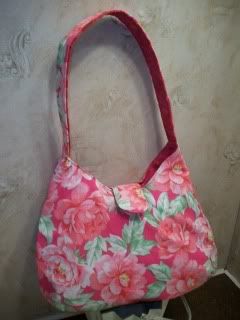
Pretty "Phoebe" Bag


One of my passions is sewing. This weekend one of my friend's daughters celebrated her 11th birthday. She's a big time bag and purse collector and so I thought it might be nice to give her something that no one else would have. One of the blogs I watch, Artsy-CraftyBabe, has some great bag patterns and I've been dying to try one of them out. So, thanks to her great FREE online pattern for the "Phoebe" bag I've managed to put together this little adorable bag for her. She opened it today and LOVED it! The directions for this bag are pretty simple and straight forward and even a novice sewer could probably manage to assemble this bag. No tricky stitching with this. My total project time for this (WITH TV watching) was about two hours. There are only really two pieces to the pattern and the majority of my time was spent picking out two fabrics and fussing over my interfacing which was having fuseability issues. I liked making this bag so much I think I'm going to make another one for another birthday I have coming up, only I'd like to add a bow or some sort of appliqued flower or initial or something to the outside to personalize it a bit more.

Monday, October 12, 2009

Projects Projects Projects

Summer is over and Fall is in full swing! The leaves are changing colors and the air has taken on the chill that comes as winter edges closer. All around our neighbors have started to decorate their homes for the season with pumpkins, corn stalks and all the bright colors of fall leaves ringed in wreaths. With the changing of the seasons my project list changes from personal projects to gift making for the holidays! Here are just a few of the things on my To Do list:

Bedside Tables Remake
New Christmas Stockings
Cat Toys/Dog Toys
Fall Table Runner
Christmas Table Runner
Fall Placemats
Christmas Placemats
Purses/Totes
Dog Kennel Cover
New Christmas Skirts
Aprons

That's the short list...I'll probably be adding more as I go. We've finally purchased a new camera so I'll be able to upload TONS of great pictures to accompany my future posts! In other exciting news, a friend of mine and I will be hosting a booth at the Altrusa Bazaar here in town this coming November to sell our homemade wizard wands! If you'd like to take a look at our craft you can view our gallery at www.OrderedChaos.etsy.com Hope you're all having a great season!

Thursday, August 27, 2009

Quilt Bag Inspired by Moda Bakeshop Tote Tutorial

This adorable bag was inspired by the Moda Bakeshop Tote Tutorial found here. I thought it was the cutest tote bag I'd seen in quite a while and fairly simple to assemble. I'm all about quick sewing projects. Now, I didn't feel like making a whole tote bag, so I shortened the measurements and made a small handbag instead. The whole project took me about 3 hours off and on while watching TV. Here's how "I" made my bag, which isn't too different from the one at Moda Bakeshop, but just incase you want the short version only.
Step One: Pick out your fabric palette. I chose jewel tones for mine and grouped it with some pretty yellow flower fabric I got in the discount bin at Walmart. Anyway, I cut my strips to be one inch thick before sewing leaving a VERY thin seam allowance. I wouldn't reccomend this to someone who is new to sewing as it can be very tricky to keep the stitching straight and even. I stitched 18 thin strips twice for the top of the bag on both sides. Then I cut out a 6" piece of fabric for the bottom of the bag. Sew this to your strips.
Now you're ready to free hand machine quilt the fabric! This part is fun if you've never done it before. I suggest practicing on a scrap piece of fabric and batting to get the hang of it first. Also, tape down your feeder so that you don't have to fight it while quilting. (The YouTube video above is basically how I did it without the taped pattern and without that octo thing.) Also, remove your presser foot for easier viewing of what you're doing.
You can see that I just did a very simple free hand curvy line throughout my bag using a light cream cotton thread that blends into the yellow but stands out subtly against the jewel toned fabric strips on top.
Next you're going to sew on your center ribbon. For the back just sew straight across on top and bottom.
On the front you'll have two different ribbons. Sew to about an inch from the center on either side so that your ribbon ends are loose enough for you to tie into a knot.
You should not have the sides sewn yet, so your bag should look similar to the one above.
When you are done with the ribbon, insert your bag liner and sew on your latch. I just used that same yellow floral as the from for a cohesive look. Attatch your straps...sew on a cute button to make use of your latch and enjoy! Hope you enjoyed that! Drop into Moda Bakeshop for other cute quilting projects!

Monday, August 24, 2009

August In A Minute

Something strange has happened when I try to upload pictures now. I get a message saying I need to download Image-Do.jpg and then my computer just sits and sits and never uploads the images. I'm completely baffled. So, no pictures this post, sorry. But here's what you've missed:

August is a crazy month in our family. Everyone has a birthday or anniversary this month and we've just added one more to the list! My husbands little brother, last to leave the nest, has tied the knot with a very sweet girl. Hubby and I were blessed to be there at their sealing in Nauvoo and to participate in all the post wedding stuff. Hubby actually gets home from Colorado Springs tonight around 10pm from the reception there.

We also celebrated no less than 5 birthdays in one sitting at the worlds largest birthday party in under 15 minutes. That was...an experience. lol Fun, but definitely odd. I don't know that I'd want to repeat that, I'd rather go to all five on their own dates...well four, cause we can skip mine. =P

Then there were other fun things that happened. Hubby and his brother playing with hubby's Star Wars toys. You've never seen Star Wars till it's re-enacted in your dining room doorway between Darth Vader wearing plaid and some random tall handsome guy with Yoda's light saber. Good times, good times. I wish I could upload the pictures cause they're quite funny.

While hubby was away in Colorado my mom and sister came down to visit (keep me sane) for a few days. That was fun. We've discovered a new game called Settlers of Catan. For anyone that likes strategy games, or just enjoys having a good time, this one's for you. Hey, someone want to trade me one wood for three ore?! he he Anyway...it's a great game that you can play with the kiddos.

I've also discovered my kitchen. After moving a month ago, I've finally unpacked the last box of kitchen items and re-arranged everything to my liking. Yay! I can't tell you how nice it is to have a "cooking" counter and a "dish washing" counter. I can actually leave my mixer out next to an outlet now without having to lug it halfway across my kitchen! If you've never hoisted a Kitchen Aid, let me tell you, they're not light. Actually, carrying it back and forth a few times would probably be a great workout for your biceps and triceps!

So that's the news from the Paint By Life homefront. As soon as I get this image uploading issue fixed I'll post pictures for you, untill then, there may not be a post for a while. Who really wants to listen (read) all I have to say anyway right? I only look at the pitures most of the time too. =P Later Guys n' Gals!

Saturday, July 25, 2009

Paper Carnation Blossoms

My husband's brother is getting married this August and we had the chance to go up to Chicago to meet the bride over the fourth of July weekend. We all hit it off quite quickly and when I found out that she didn't have anyone hosting a bridal shower for her I jumped up and took the opportunity to volunteer! Though I could have gone the way of wacky crazy fun, I decided that she should have something more sophisticated and "pretty"...cause that was my first impression of her. So I've started planning and without giving away too much the theme for the party is loosely based off the quote, "Bloom Where You're Planted." Having grown up in another religion and then joining the LDS church later in life, I understand her position in her family as the only member as well and the great adversity that comes with learning the truth about the Gospel and overcoming all the trials along the way to becoming the daughter of God that you're meant to be! I guess I just gave away more than I wanted!

Such a theme needed some pretty awesome decor, and I've just completed about 250 of these little paper carnation blossoms that will adorn several items. My camera is on it's out, but I hope you can see that these little flowers are quite beautiful! I found the tutorial to make them on PlanetJune.com This website has easy to follow directions and the results look even more amazing in person than they do in the pictures! I plan on using a variation of this to make some daisies as well and will post those when and IF I've succeeded in designing them. Hope you enjoy!

Saturday, July 18, 2009

Blueberry Pie


I woke up this morning with a craving for blueberry pie, and so made a run to the market to pick up some cartons of blueberries while they were still cheap (Aldi, I LOVE you!) After rolling out the dough for the top crust I thought to myself, I bet those pretty butterfly cookie cutters I bought at The Cookie Cutter Shop would look amazing on this! So I pulled them out, cut several butterflies out and came up with this pretty pie! The sad part about pies that look so pretty...you don't want to cut into them. I'll get over it later tonight when it's cool enough to eat! Here's the recipe:

Blueberry Pie

1 recipe double crust pie pastry (I'll post below)
5 cups blueberries (about 2.5 cartons)
3 tbsp flour
2/3 cup sugar
1 tsp cinnimon

1. Prepare double crust pie recipe as directed.

2. In a large bowl, wash blueberries and drain. Coat with flour, sugar and cinnimon. Pour into pie pan.

3. Place top pie crust layer over top of blueberry filling and seal edges as desired. Be sure you have a center vent. Decorate as desired. Brush with milk...may add extra sugar to top if you'd like. I chose to use my butterfly cutters for the center vent and all decor. Place foil around edges of pie to prevent over browning or burning. Place on foil lined cookie sheet to protect oven from any bubbling over.

4. Bake in 375 degree oven for 25 minutes. Remove foil edging. Bake an additional 25-30 minutes or until blueberries are bubbly and tender. Remove from oven and let cool on a wire rack. Serve with scoop of icecream. Enjoy!

Double Crust Pie Pastry

2 cups flour
1 tsp salt
2/3 cup plus 2tbsp shortening
4-6 tbsp cool water

1. Combine flour and salt into large bowl.

2. Add shortening and blend until pea sized lumps form.

3. Add water 1 tbsp at a time and blend until moist but not sticky. Should stay together when squished in a fist, but still be crumbly.

4. Divide dough in half. Set aside one half for top of dough. Roll out one half of dough for bottom layer, rolling 1 inch larger than pie pan. Place in pie pan, insert filling.

5. Roll out second half of dough. Cut out center vent with decorative cookie cutter. Place over pie filling and trim 1/2 inch overlap to bottom layer. Tuck under first layer pie pastry and "pinch" edges closed. Decorate trim as desired. Cut slits in top next to pie vent.

Tuesday, July 14, 2009

Butterfly Cookies!

I disappeared for a while there, sorry about that! Hubby and I just moved into our new place and are still working on unpacking and getting settled in. However, my kitchen is open for business and I've already started working on some yummy treats! The inspiration for this latest one came from the beautiful butterfly cookies at Sweetopia. I'm new at the whole cookie decorating thing but I think mine turned out fairly well! My biggest excitement upon getting moved in was the arrival of my beautiful new butterfly cookie cutters from The Cookie Cutter Shop! As soon as I opened them I got to work on my first batch EVER of sugar cookies. The purpose for this particular batch of cookies: to say THANK YOU to all the great friends from our church that helped us move and clean our last apartment. So without further ado, I submit my cookies for your viewing pleasure!


The Cookie Cutter Shop sends a little card with their sugar cookie recipe, which is what I used. You can use your own recipe. For the glaze on top I used the following recipe:

2lbs confectioiners sugar (aka icing sugar)
1tsp lemon juice
2 egg whites

1. Beat lemon juice and egg whites in a mixing bowl, slowly adding sugar. Beat until soft peaks appear. Icing is ready for piping at this stage.

2. For liquid icing, add enough water to soft peak stage icing after piping that it remains slightly thickened. When a spoon drizzle blends easily into the mix it's ready.

So there you go! I'm hoping to make some more yummy decorated cookies in the future!